Cinnamon & Sultana Loaf

Cinnamon and Sultana Loaf

I have been slightly remiss on keeping up with the blog at the latter end of this week.  Partly because we haven’t solved our oven conundrum yet, a situation which lends itself to less innovative meals, and partly because the bat mobile is still out of action thanks to the clutch slave* breaking which has meant we’ve had to rework our travel timings to include buses or walking.  But mainly because we have a new addition to our family who we picked up on Thursday evening.

So, in honour of both my first birthday as a blogger, and the excitement of it all, I am going to break my usual pattern of behaviour and insert another photo

Billie2

May I introduce you to Billie, our beautiful eight week old chocolate labrador puppy, who is heart-meltingly gorgeous in every way.  Her full name, for those who may be interested, is Billie Jo Bob, (chosen by the wee boy), although we are just using Billie for everyday wear.

Now who amongst you didn’t go ‘ahhh’?  Not many, I imagine.

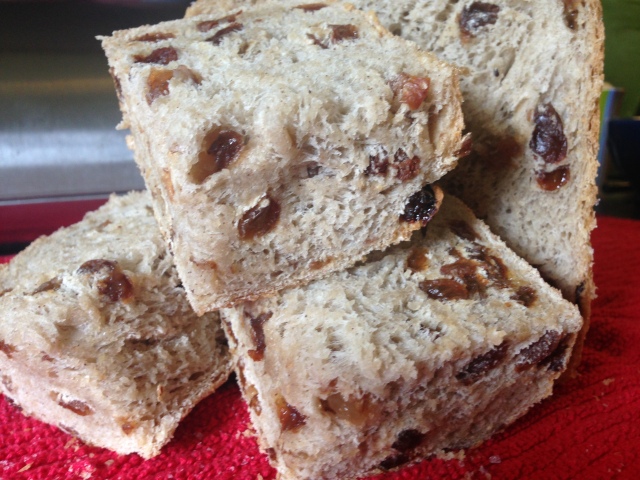
Beautiful distractions aside, we still need to eat and although our oven may have gone on a permanent holiday, we do have other gadgets, such as the bread maker, that can cook.  So today, at the request of the wee one, I made some cinnamon and sultana loaf.

I tend to use a basic bread recipe and add stuff to it, then call the bread whatever I may have added.

So, my basic bread recipe (apologies, it is in ‘old money’) is 14floz lukewarm water, 2 tablespoons of olive oil, 20lb 10oz good strong white bread flour – I always get my flour from Bradshaws – 2 teaspoons salt, 2 teaspoons sugar, 2 generous teaspoons dried yeast.

To make this particular loaf I added another 2 teaspoons of sugar, 1 teaspoon cinnamon, 1/2 teaspoon nutmeg and a bowlful of sultanas.  I like my fruit loafs to have a lot of fruit in them, you may feel less inclined to pack in the fruit.  It is, once again, your own personal taste.

Now this is the thing.  The nutmeg is a rough guess really as I have been using whole nutmegs and grating them.  So in this bread recipe, I grated some nutmeg into the flour mixture until I got a little weary.  But I’m guessing it was about half a teaspoonful.

Put the bread machine onto a sweet bread setting and start.  I have one of those machines which is not as meticulous as I at getting into the corners, so I tend to give it a starting hand with a spatula.  At some point, about 10 – 15 minutes in, the machine beeps like a very annoyed alarm clock for approximately one minute.  This is when I add the sultanas. Then leave the whole thing to bake, which in my case, takes 3 hours and 25 minutes.

I never find bread maker bread tastes as good as bread cooked in an oven but it does the job.  The top of the loaf always looks as though it’s just recovering from a debilitating bout of influenza, and the bread maker ‘paddle’ as it’s called, has to be pulled out which leaves a slight gap in the bread half way through the loaf, but none of these slight irritations are insurmountable and, quite frankly, we are very lucky to have the bread maker at all.

Finally, whilst the bread top is still warm, melt a dessertspoonful of castor sugar in a drop of boiled water and brush on the top of the loaf.

Delicious warm or cold, with or without butter.  Perfect with a cup of tea.

*Whoever named car parts should take a long hard look in the mirror and ask themselves where they left their soul when they named the inner workings of a car.
Homemade Fruit and Nut

homemade fruit and nut

Recently we made the decision to get rid of our microwave.  Mainly because it has been sending out sparks regularly, and also because, apart from warming things up like milk, we no longer really have any use for it.  What I mean by that is, everything that we use it for can be done on the hob.  Like melting chocolate, for example.

However, it turns out you really do have to pay attention to detail when transferring these skills to the hob.

I have been trying to make another batch of chocolate slices for the wee boy to take to two of our most treasured girls as a little treat and thank-you for looking after him.   This involves melting some milk chocolate which I used to do in the microwave. Give or take the odd mishap where I forgot that it needs turning in order that the pieces in the centre don’t burn, all went well.

When melting chocolate on the hob, you need to place it in a bowl which sits over a pan of simmering water.  Two elements which in themselves are simple.  For some reason putting them together complicates the issue.  So today, whilst dashing to get everything done in the shortest amount of time, I prepared both pans for the base and chocolate melting, congratulating myself on the way at my efficiency, and set to with the base whilst allowing the chocolate to melt.

Very gradually a strange smell emerged which was familiar, and yet, new.  I looked outside to see if anyone was burning wood but could see nothing.  I then decided to just give the chocolate a stir whilst it was melting which is when I noticed that it was slightly burning on the bottom, rather like it used to in the microwave when I forgot about it.

However, thinking I had rescued the chocolate in time, I turned the heat down and continued with other things.  But the smell intensified, until I had no option but to lift the bowl with the melting chocolate up, as it smelt as though the pan was burning.

It tuns out that I hadn’t even put any water in the pan.

Undeterred by this slight flaw of domestic goddess-ness, I whizzed up some almonds, mixed them with sultanas and put them into the melted, burnished chocolate, spread out on a bit of foil and popped into the fridge.

You know it actually tastes rather delicious.

Little Balls of Wonder

Healthy Cocoa Truffles

These little balls of wonder are to die for.  And what’s more they don’t have a grain of sugar in them.  Not one iota.

Now this is the thing.  Whenever I have a go at making balls of things, they never look as they should, in my opinion.  I’m not the world’s best circle roller.  Actually, I have no idea how those people on the telly do it, but it always looks so simple. Anyway, that doesn’t detract from the fact that they are delicious, and, I’m sure much more healthy than other round sweet things you could make.

Why? Because the only ingredients they have in them are dates, cashew nuts, raisins or sultanas, cocoa powder, ground rice and water.

Now I know all dried fruit has natural sugars, in fact some are as high as 70%, but what they also have is fibre which, in my book, makes them good for you and I have decided I am an expert on the matter since I once gave up sugar for six weeks, four hours and thirty seven minutes.

*moves swiftly on*

The trick, I think, is to make sure you get the proportions right.  45% or so of the mixture needs to be dates, 25% cashew nuts, 15% raisins or sultanas and 5% cocoa. The more observant of you will, by now, have realised that my ingredients add up to 100% and there is, as yet, no mention of the ground rice.  That is because it is an optional added extra that I literally just sprinkle a little of over everything else before setting to, and pulping.  It adds a little texture and fortitude, but they would be just as scrumptious without it.

As a slight diversion away from the subject in hand, but a necessary discussion to have, I have realised that to get any further on my culinary journey, I really must think about investing in a food processor.  I used to have one, but a combination of age and not paying attention when it was on meant that, gradually, all that was left was the motor.

For a while I convinced myself that I would replace the parts that had worn or broken, but one day, in a moment of enlightenment, I made the executive decision to ditch it.

Since then I have relied upon my trusty steed, otherwise known as a hand blender, to see me through the ‘make into a pulp’ or ‘liquidising’ phases.  However, even the trusty steed has it’s limits, and today we reached one of them.  You really do need a food processor for these little balls of wonder.  I managed with a combination of using the mezaluna to cut the big pieces down to size, and the trusty steed to completely blend together, but it wasn’t without hazard and not the most enjoyable process, whereas with a food processor it’s bish bash bosh done.

Once the mixture is all pulped, you may need to add a little water to bring it all together.  Then roll into balls and roll these balls in some cocoa powder.  The size of the ball is up to you, but there is a certain satisfaction about just popping something whole into your mouth and savouring, so I would recommend a small teaspoon size or less.

The only down side to this taste sensation is that it is very difficult to not scoff the lot in one day.  Consequently, I have absolutely no idea how well they last.

So if any of you do decide to give them a go and get past the 24 hour mark, do let me know what happens next.

Scones

sultana and cherry scones

Due to unforeseen circumstances I have found myself having to spend quite a bit of time over the last day or so, lounging.  Why?  Because I inadvertently stood on a very sharp thorn whilst burning the final few bits of wooden debris in the garden. Unfortunately I had flip flop style footwear on at the time which allowed the thorn to pierce both the footwear and the foot.

I am aware that I really need to address the attire I decide to wear when gardening, as those who have known me a while will attest that I have an inability to walk past a bit of greenery without it scratching me in some way.  However, every time I venture into the garden, I am convinced that, this time, I will come away unscathed. Which is why in the spring and summer months, I regularly look akin to a self harmer.

Be that as it may, I have, as a consequence, been hobbling around like an old donkey, and therefore decided to self impose restricted movement in order to allow the puncture to heal.  I would like to think this episode was life’s little way of telling me to slow down.  Others may interpret the situation differently.  Either way it has afforded me a guilt free weekend of watching all sorts of items on the television, including a plethora of cookery programmes.  A consequence of which was that this morning I made my best attempt at an omelette, ever.

*takes a small bow*

Buoyed up by this milestone of a success, this afternoon I decided to knock together a few scones for afternoon tea.  Notice the very laissez faire attitude I now have.  It’s amazing what a little minor success can do to a girl’s culinary beliefs.

Anyway, I veered away from my usual recipe and plumped for a more traditional, heavy on the flour, light on the sugar and butter based recipe, which goes like this:

450g plain flour, 2 teaspoons baking powder, 1/2 teaspoon salt, 2 tablespoons sugar, 55g butter, 250ml milk.  I added sultanas and cherries but they could always be replaced by cheese, just cut out the sugar and add a little english mustard powder.

Bake in a hot oven. gas mark 7, for 10 – 12 minutes, unless you have an oven like mine in which case you will need to keep them in for around 15 – 20 minutes. They’re delicious eaten warm with butter and jam.  Or just butter.  Or just jam.

Whichever is your penchant, there is something deeply satisfying and indulgent about lazy Sunday afternoon tea and scones.

Courgette Cake

Courgette Cake

Having sampled this cake a coupe of years ago, made by one of my many talented and lovely friends, the memory of how wonderful it tasted has stayed with me, although I have never, until now, managed to rustle one up.

Turns out it is the simplest thing to make, and although I am still not eating sugar so therefore won’t be able to sample my goods, it will be going to the wee boy’s Kindergarten Spring Fayre, which is happening on Saturday so hopefully will all be eaten.  Actually, there is enough mixture to make two of then which, in my book, is a result.

This is what you will need:

3 eggs, 275ml sunflower oil – I used vegetable oil as I didn’t have any sunflower oil and I figured there can’t be that much difference – 350g caster sugar, 350g courgettes grated, 165g plain flour, 165g buckwheat flour – once again, I didn’t have any so I used wholemeal plain flour – 1tsp baking powder, 2 tspns bicarbonate of soda, 1tsp cinnamon, 175g raisins – I used sultanas, see previous excuse – 150g walnuts chopped.

Now then, here’s a thing with putting nuts into a cake.  I absolutely love them but the wee boy and his friends are going through a phase of ‘being allergic’ to things, which roughly translates as not liking them, so I have left the nuts out of this recipe as it has the ‘I’m allergic to nuts’ foray written all over it.  Instead I replaced them with a handful of chia seeds, for texture.

Pre-heat the oven to gas mark 4. Then, either grease and line the base of two 900g/2lb loaf tins or, if you’re like me, you will have purchased, for absolutely no other reason than the thought that they might come in handy one day, a packet of paper loaf tin liners.  I was beginning to think they may have to be used for something to paint onto, but now I am completely absolved from buying ‘just in case stuff’, as they fit the tins perfectly.

Put all the ingredients together and mix to make a thick batter.  Pour into the cake tins.  Bake in the pre heated over for about an hour until the loaves are firm and a skewer comes out clean.  Sadly, I couldn’t remember what time I put the cakes in as I was ‘multi-tasking’.  However, I went by the smell of the oven and actually, although when I first tested them they weren’t quite done, I left them in a little longer, turning up the heat ever so slightly, and there was no dip at all.  Which has given me a completely disproportionate belief that I know what I’m doing.

Cool the cakes a little before turning out on a wire rack.

I have left one of the cakes without anything on top but the other now has a glaze made up of lime juice and granulated sugar. Of course I am unable to tell you what that will taste like but I reckon it should compliment the cake well.  I will be able to tell though, because when you sell cake at a Fayre, people never come back for a second slice if it’s not palatable.

I’ll let you know what happens.

Baked Chicken and Rice

photo (75)

There is something very satisfying about putting a whole load of things in a dish and popping it in the over to discover, about forty minutes later that not only is it all cooked, but the alchemy of the food blends so beautifully together that you have something very gratifying to eat.  And so it is with baked chicken and rice.

Here’s how I do it.

Grease a dish with a little butter.  Add rice, chopped chicken pieces, red and yellow pepper, sultanas, nuts, chicken stock, salt and pepper.

Put it in the oven, gas mark 5.

Make a cup of tea.

Wait.

Look in the oven after around twenty minutes as it might need a bit of a stir.  My oven tends to cook things round the outside of the dish quicker than in the middle, so I give it a gentle swirl and sometimes add some more hot water.

Twenty minutes or so later, take out of the oven and serve.

It’s a little bit like savoury rice, but the sultanas add a touch of sweetness that I find irresistible.  Of course, you could, should the feeling take you, just bake the rice with the peppers etc and cook the chicken separately.  Either way, the results are always enjoyable.

And, as a little aside, it looks beautiful.